Showing posts with label Recipe. Show all posts

Friday, August 12, 2011

Friday Eye Candy {16- Stomach Candy?!}

I totally missed out on yesterday's recipe post... I was hungry and forgot to take ANY pics while I was making it... Or after it was made... My bad. BUT if you want to know what I made... It would be THIS recipe. It's REALLY REALLY good I promise...
Hence the no-pics-because-I-scarfed-it-down :-)

So anyways.... How about another

Er :-/ stomach candy???


All of these can be found on my YUMMY Board on Pinterest.
The links below the pictures will take you straight to the recipe!
I'll be linking up to THESE awesome parties!

Tuesday, August 9, 2011

Pepperoncini Pepper Crock Pot Roast Recipe

I think this week is going to have to be Recipe Week here on 20Something! I've been cooking up a storm lately and I have to share these yummy creations!


This is a recipe from the kitchen of my momma!
(I think?!?! Mom? Help me out here...Is it from you or Mawmaw?!?!)


Pepperoncini Pepper Roast

What You Need:
1 Roast (Size depends on how many you are cooking for)
1 Large Bottle of Italian Dressing (I use low fat)
1 Jar of Pepperoncini Peppers

To Make:
Put Roast into crock pot
Cover with Italian Dressing and Pepperoncini Peppers
(Make sure roast is covered- More dressing and peppers may be needed for larger roasts)
Turn crock pot on low.
Let cook for 6-8 hours. (Cook time varies based on roast size)


Serve with pasta or your side of choice {See photo 1}
Or shred and serve on toasted buns with mozzarella cheese! {Photo 2}

Don't forget to check out my recipe from yesterday!


Linking up with some of these parties!


Monday, August 8, 2011

Italian Basil Chicken Pasta

Ever have those nights where you thaw something out for supper having NO idea what you're going to make? Where you just cross your fingers, throw something together, and pray that it's edible? It happens to me more often than not. Especially when you're broke and you just buy what's on sale at the grocery store.

The other night I did just that. Set some chicken out to thaw. Figured I could throw some seasoning on it, open a can of green beans and be good to go. Little did I know, I was about to create a masterpiece!

May I introduce...


Italian Basil Chicken Pasta


First I put the chicken into a Ziploc bag.
I poured in enough Onion Powder, Basil, Garlic Salt, Italian Seasoning, and Panko bread crumbs to coat the chicken. {Don't ask about measurements... I have no idea... I eyeballed it.}


Then I heated up a bit of vegetable oil in a large skillet and browned the chicken.
I boiled some spaghetti and when it was al dente, I drained it and added a bit of spaghetti sauce.

There you have it. Quick, simple, and yummy! Just the way I like it!


I'll be linking up to some of these AWESOME parties!

Wednesday, June 1, 2011

The Perfect Southern Drink

The PERFECT Southern Drink: Sweet Tea


To Make:
Simply add 4 regular size tea bags (or 2 Family Size) to your coffee pot.
Let brew with 12 Cups of Water.
In a large pitcher add 1 1/2 Cup of Sugar.
Add tea and stir 'till the sugar is disolved.
Add water to the brim and stir again.


Serve Ice cold and garnish with lemon as needed.

Perfect!

I'll be linking to some of *THESE* great parties!
(One is having a giveaway! Check them all out to see who!)


Sorry for those of you looking for my "What I Wore post... I'm currently wearing a SUNBURN! Not fun...

Monday, May 9, 2011

Mexican Casserole Recepie

First let me start by saying that no matter HOW many pictures I took while making this or how many pictures I took of the finished product... It looks gross. But trust me IT'S AMAZING!!! Okay on to the recipe!

Mexican Casserole
What You'll Need:
  • 1 LB of ground beef (Or Turkey)
  • 1 Can of Rotel
  • 1 Can of Cream of Mushroom Soup
  • 2 Can's of Ranch Style Beans
  • 5ish Corn Tortillas
  • 1 Cup of Mexican Blended Shredded Cheese

To Make:
  1. Pre-Heat Oven to 350
  2. In a skillet brown hamburger meat. Drain Fat.
  3. Combine meat and canned goods in a large bowl.
  4. In a 9 x 13 Casserole dish tear tortilla's into 4th's and line the bottom of the dish.
  5. Pour meat mixture over the tortillas.
  6. Top it off with the cheese.
  7. Back at 350 for about 30 minutes. (Until it starts to bubble.)
  8. Remove from oven and let cool.
You can serve it alone or with chips and salsa!
Serves 4-6
Just the two of you? That's okay too! Cover pan with aluminum foil and store in the fridge. When you're ready just heat some up!
(It's really good on day one... but honestly I kinda like it better on day two!)

Enjoy!


I'll be linking to some of *these* great parties!

Monday, December 20, 2010

I love when my house smells like trash...

WHAT?!?! Yes! I love when my house smells like trash! That's how I know Christmas is near! Okay you all must think I'm CrAzY! And although I might be a little nutty I'm not talking about the trash that you throw away or put in a trash can (Although my mom has a large popcorn tin that is called the "Trash Can") Trash is a secret family recipe for chex mix! (Saying secret family recipe makes me think of Busch's Baked Beans... If only I had a talking dog!) It is sooooo yummy! We have it EVERY year around Christmas! Right after Thanksgiving my brother "Tom" is usually begging my mom to make it! So here's the recipe...

1 Box Rice Chex
1 Box Wheat Chex
1 Box Corn Chex
1 Bag of Pretzels
1 Box Cheerios
1 Jar of Peanuts
1 Jar of Mixed Nuts (It calls for Pecans but Mom and I like the mixed nuts better, + they are cheaper)

Mix all of that together and divide between 2 large baking dishes (I get the aluminum foil roasting pans)

Next Melt 1/4 Cup of Butter and 1/2 Cup of bacon grease
Add 1 Tbsp Savory Seasoning
3 Tbsp of Tabasco
3 Tbsp Worcheshire

Pour over Chex mix and stir! Bake at 250 for about an hour and a half stirring occasionally.


Next let cool and ENJOY! I promise this stuff is AMAZING! There is WAY too much for the hubs and me so I usually take one pan and put it in jars to give out for Christmas! I have no idea why we call it Trash... but we do! It might be because it's fun to say you're eating Trash! People really look at you like you're nuts then!


Ok so it hit me today... only 5 MORE DAYS TILL CHRISTMAS! Good thing I only have 2 more presents to buy! I still have to wrap everything but I can do it! I hope?!?!?!?! How is y'alls Christmas shopping and wrapping shaping up?!?!


Monday, November 29, 2010

I'm Back!!!

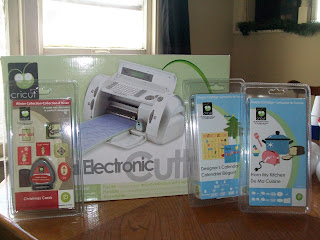
First off I want to say that I'm sorry I missed Friday's post! I know I said I would be back but I was enjoying my 4 day weekend! I also got a little surprise Saturday! My mom came down and surprised me with an early birthday present!


I'm soooooo ecstatic! I've been playing with it the past couple days! Thank you, thank you, thank you to everyone who got me the Cricut and my accessories! Once I've got it figured out I'm making some thank you cards for all of you! 

So anyways on to today's post! I said I would have a tasty recipe for you. So what's cookin'?


Monkey Bread!
What you'll need:
  • 2 Can's of Cinnamon Rolls
  • 1 Box of Raisins (They didn't have a big box so I got a package of individual boxes)
  • 2 sticks of butter
  • Cream cheese and Powdered Sugar if you want homemade icing (I just use the stuff that comes with the cinnamon rolls)
  • Bunt Pan (If that's what it is really called?!?! I dont' know technical terms here!)


Start by opening the Cinnamon rolls and cutting pieces about 1/2 an inch to 1 inch. After every layer or so I but some raisins.


After you've cut up 1 package of cinnamon rolls melt 1 stick of butter and pour into the pan.


Next cut up the other package of cinnamon rolls and layer more raisins as you go. When you're finished do not add any raisins to the top of the mixture. Burnt raisins are not tasty... I did that the first time I made this.

Bake at 350 until a toothpick entered into the center comes out clean. Flip onto a cake plate or other serving dish.


Add icing and enjoy!


Side Note: Going somewhere with a cake and don't have a cake plate or other "meant for cakes" storage container? Flip over a large bowl and use the lid as the plate! It works perfect for rounded cakes like this monkey bread!

Another Side Note: I'm on my second week of 5 Dinners in 1 Hour and I can not rave about this enough! Not only does it help me sooooo much with time management but Gary and I are eating healthier too! And the food is soooooo delicious!!! Go check it out and SIGN up today!!!

Tuesday, November 16, 2010

Spicy Ranch Crackers

Mom gave me this recipe and I love these! Spicy Ranch Crackers! They're the perfect snack to have around!


What you need:
1 Box of Saltine Crackers
1 Package of dry Ranch Dressing Mix
1 Cup of Vegetable Oil
Crushed Red Pepper
Measuring Cup
Tupperware

1. First thing is to gather ingredients

2. I use two separate Tupperware holders so I put 1/2 of the Crackers in each


3. Measure out 1 Cup of oil
4. Add the dry ranch seasoning and crushed red pepper (I don't like a lot of spice so I just eyeball it so it looks good! The recipe actually calls for 1 Tbl spoon)


5. Mix it all up until it looks milky like this!


6. Pour mixture of the crackers


7. Shake up the Tupperware to coat the crackers. Then flip the Tupperware ever so often (I do it every time I walk past them)

The next morning you wake up and they look like this!

MMMMMMM!!! Soooooo tasty!


Side note...
This stuff is AMAZING! The nights that I work late and don't really feel like cooking a full meal I make a pan of this stuff and "Voila!"  a complete meal! 1 pan 10 min. Can't beat that!


Last night I put away all of my Fall decor and busted out Christmas! I can't wait to get the house all decked out! I've got soooo many good ideas! I'm going all out this year! Can't wait to see what our featured guest will be coming up with too!!!
Related Posts Plugin for WordPress, Blogger...