Tuesday, November 30, 2010

O Christmas Tree O Christmas Tree!


My "how to make a scrawny tree look full" tutorial!

I would LOVE to have a big 9 foot tree with like a million tips that make it look huge and luscious but let's face it... not all of us can afford a nice huge tree. And I don't want a Charlie Brown tree either. So This is how I make my cheapo tree look full.

 First I start at the bottom when putting it together. As I go up the tree I string my lights. And I don't fluff the branches until I'm done putting all of the "limbs" on.


Another trick is to use green garland throughout the tree to fill in those bald spots!


Next I add my garland or ribbon. This year I cut strips of burlap!


Next start with your largest ornaments then work smaller. This way you cover all of the biggest bald spots (that you didn't already cover with both types of garland) first. As you work your way to your smaller ornaments take a step back and look at your tree ever so often. And don't forget to walk around your tree too! You want to make sure that any place that will be visible (either from inside or outside your window) is decorated!


Finish with a large bow or star to top of your tree. Then sweep/ vacuum and add your tree skirt! Your tree skirt doesn't have to be this perfectly round piece of fabric. Mine is some more burlap! It's actually a rectangle that I just positioned to look round!


Tomorrow is the first of the month and we'll have our 1st of the month feature!!! I got a sneak peak at Sarah's project and it's super cute!!! Y'all come back tomorrow!!
Monday, November 29, 2010

I'm Back!!!

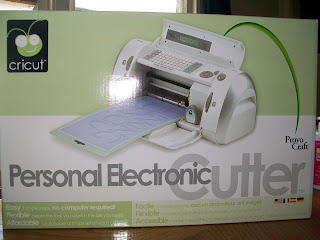
First off I want to say that I'm sorry I missed Friday's post! I know I said I would be back but I was enjoying my 4 day weekend! I also got a little surprise Saturday! My mom came down and surprised me with an early birthday present!


I'm soooooo ecstatic! I've been playing with it the past couple days! Thank you, thank you, thank you to everyone who got me the Cricut and my accessories! Once I've got it figured out I'm making some thank you cards for all of you! 

So anyways on to today's post! I said I would have a tasty recipe for you. So what's cookin'?


Monkey Bread!
What you'll need:
  • 2 Can's of Cinnamon Rolls
  • 1 Box of Raisins (They didn't have a big box so I got a package of individual boxes)
  • 2 sticks of butter
  • Cream cheese and Powdered Sugar if you want homemade icing (I just use the stuff that comes with the cinnamon rolls)
  • Bunt Pan (If that's what it is really called?!?! I dont' know technical terms here!)


Start by opening the Cinnamon rolls and cutting pieces about 1/2 an inch to 1 inch. After every layer or so I but some raisins.


After you've cut up 1 package of cinnamon rolls melt 1 stick of butter and pour into the pan.


Next cut up the other package of cinnamon rolls and layer more raisins as you go. When you're finished do not add any raisins to the top of the mixture. Burnt raisins are not tasty... I did that the first time I made this.

Bake at 350 until a toothpick entered into the center comes out clean. Flip onto a cake plate or other serving dish.


Add icing and enjoy!


Side Note: Going somewhere with a cake and don't have a cake plate or other "meant for cakes" storage container? Flip over a large bowl and use the lid as the plate! It works perfect for rounded cakes like this monkey bread!

Another Side Note: I'm on my second week of 5 Dinners in 1 Hour and I can not rave about this enough! Not only does it help me sooooo much with time management but Gary and I are eating healthier too! And the food is soooooo delicious!!! Go check it out and SIGN up today!!!

Wednesday, November 24, 2010

Giveaways!

So Gary told me that my craft for today should be me trying to master the art of Call of Duty. I'll be honest! I did take the night off from crafting to spend some time with my honey! Don't worry I've still got a lot to talk about today!!! Like all of the AMAZING giveaways that are going on right now! Who doesn't love a giveaway? Especially around Christmas!!! So here are a few giveaways that are floating around right now on the blogs that I follow...

Fingerprints on the fridge is having a Sodderbug giveaway! Those charms are tooooo friggin' cute! Go check it out and sign up for your chance to win! They would be GREAT Christmas gifts!


Anna over at take the side street is giving away really pretty earrings from Lia Sophia! These earring are beautiful! Travel on over to Take the Side Street and check them out!


And last but certainly not least is the Santy 2 Chic girls! They are currently having TWO giveaways! Yup you read that right, TWO!!! The first one is for a Silhouette machine!!! I want  NEED one soooooo badly! I would do ANYTHING to get one, including blog about it for another entry to win! ;-)


The second giveaway is for Gorilla GLUE! Who couldn't use some Gorilla glue?!?! That stuff is AMAZING! You can use it for EVERYTHING!


So scoot on over to all of these amazing blogs to sign up for the giveaways and see what cute things they're all crafting up!!! All these ladies are amazing at what they do! Go check them out!!!


P.S. I will not be posting tomorrow! I will be spending time with my family eating lots, watching the Macy's Thanksgiving Day Parade and just relaxing! I will be back Friday with a tasty recipe!!! Anybody who is traveling today or tomorrow please be safe! And have fun with your family and friends!!!

Tuesday, November 23, 2010

Feature, Experiment, and Rosettes!

OMG! I'm uber excited today! I got my first feature! It may not seem like a lot to y'all but when your a baby blogger who's not even two weeks old getting your first feature it's quite exciting! Thank you for all of the support! I appreciate all of the wonderful comments and support I'm being given! Thank you thank you thank you!!! Now scoot on over to Sassy Sites and check out my feature and all of the other wonderful ideas over there! But come back! I've got cute things ahead!


So I was a busy bee last night... I did an experiment. Would flat black paint work as chalkboard paint? Ummmm the answer is NO! At least not on glass... Maybe I'll do another experiment to see if it would work on another surface but it won't work on glass. I did about 4 coats and when I went to prime it with my chalk it started to peel off. It wasn't pretty...


So until I find a cheaper alternative to my new found love I'll keep dishing out $10 a quart on the stuff.

In other news... I think that me and the girls over at Shanty 2 Chic had the same idea. Well kinda. Have you seen their ruffle tree and the rosette tree? If not go check them out they are tooooo cute! I bought all of these wooden circles to make peppermint ornaments and well... I can't draw pretty peppermints. So I was thinking to myself what am I going to do with a bunch of wood circles?


And then I remember that my grandma was talking about how she loved fabric rosettes... So why not put them my tree??? Ok so the Shanty girls and I didn't have the EXACT same idea but it's similar. They made a little tree covered in rosettes and I made rosette ornaments to cover my big tree. I followed their instructions on how to make the rosettes but I didn't want a button in the middle of mine. So after folding my strip of fabric in half I folded the end in half again and again then rolled it so that it made a tiny bud.


It's kinda hard to see because of me trying to hold tight but go with it! :-)


Then I put a dab of glue (hot glue) in the center of the wood circle and pressed down. Then I started twirling and gluing... I would twirl the fabric and then twist it around my bud in the center and glue ever so often. About the time my glue gun was ready to drop a glob I was there to use it!


Once I was done I had a bunch of rosettes. Now here is where I messed up... When you're at the end of your fabric and ready to glue it to the back of the wood go ahead and have your hanger ready to glue down at the same time. It will save you the extra step that I had to take of going back and adding my twine hanger.


Now you have beautiful rosette ornaments to adorn your Christmas Tree!!

Linking To:
http://todayscreativeblog.net/
http://linda-coastalcharm.blogspot.com/


Monday, November 22, 2010

Chalkboard Platter

Hello again! Sorry I missed Friday's post! I was feeling a bit under the weather! But I'm back and ready to rock n' roll! Y'all saw my last chalkboard right? ( If not look here ) Well I am COMPLETELY obsessed with chalkboards! I could have one in every room in my house and that wouldn't be enough! So when I came across these cute silver platters at Dollar Tree I knew just what to do!


(Sorry I didn't take a "before" shot. I forgot until I was halfway done taping them off!)


So you tape them off and then paint! It took about 4 coats of paint. If you get them you'll notice that there is an etched design on the platter, DON'T worry it's really light and the paint will cover them...
So after 4 coats of paint and over night drying time they looked like this!


(I LOVE the detailing around the sides!)


Perfect chalkboard platter for my kitchen!


Side note: There is now a "subscribe" box to the right! Enter your e-mail address and get 20 Something delivered to your inbox!

Linking To:

Thursday, November 18, 2010

Cardboard Wreath!

Yup you read that right! CARDBOARD WREATH!

What you're gonna need:
  • A Large sturdy piece of cardboard (I used the box my new TV came in)
  • 54' of Wireless Garland  (I found mine at Dollar General for $2 per 18'! It worked great because it wasn't wired and therefore it was easy to wrap around my wreath)
  • Glue Gun
  • Ribbon
  • Sharpie
  • Exacto Knife
  • and Scissors 


Cute puppy side-kick completely optional!


First Figure out how big you want your wreath to be (and what shape, I did a rectangle about 18"x22")
Then draw it on the cardboard.


Next CUT AWAY! I tried to use my Exacto knife and it wouldn't cut through this thick of cardboard... insert scissors! The first cut wasn't that pretty I just wanted to get the biggest part out of the way so that I could focus on cutting along the line!


Next draw the center to your wreath (I wanna say I used about 12"x14")


Then I stabbed cut a huge X in the center so that the cardboard would be easier to maneuver around while I cut out the center. I know it doesn't look pretty right now, but it only has to look pretty when complete right? :-)


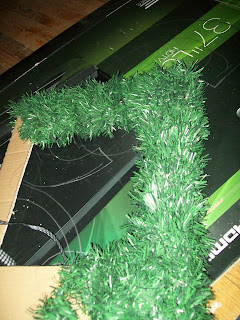
After I cut out the center using both scissors AND the Exacto knife it looked like this


I then attached a ribbon to use as a hanger. Then I did what I like to call the wrap and tack! Wrap the garland around the cardboard  wreath (it's becoming a wreath now so I should refer to it as such!) and ever so often use a little glue to keep it in place, especially around the corners.


After you get all the way around you will have some excess. I cut off the extra and used it anywhere I still saw a bit of cardboard. When completed it looked like this!


I felt it needed a little extra so I made a bow and I knew just the place for my new wreath! Above my couch, right dab smack in the middle of the windows!


Excuse the paint that needs touch up... That IS on my list of things to do around the house! Overall I'm quite pleased with the results! I would love to see yall's take on it! Maybe add some berries or ornaments?!?!?!


Linking Up To:

Related Posts Plugin for WordPress, Blogger...